Tuesday, January 7, 2014

Hot Mocha Mix


This frigid weather leaves me wanting something warm to ease the chill!  I am not a tea drinker, and sometimes I want something other than coffee.  My mocha mix is just the thing that hits the spot.

This is a recipe for which I cannot take full credit.  It is a recipe I found in the Montezuma Amish Mennonite Cookbook vol.1.  I simply adjusted the portions to suit my taste.  I love this mix!  We have been drinking it for several months now.  Hope you try it!

Hot Mocha Mix
2 c instant nonfat dry milk
2 1/3 c sugar
4 c non-dairy coffee creamer (I find that the extra rich is best for my tastes.)
1/4 c cocoa (I use Hershey's unsweetened cocoa.)
1 1/2 c instant coffee  (I use Folgers.)

Mix all the ingredients well in a large container.  Store in an airtight container.  For each serving, place 3 T in a cup and add 1 cup of boiling water.  Stir well and enjoy! 

Until we meet again, may you be blessed!

Saturday, January 4, 2014

Southwestern Style Cornbread

This must be the season for experimenting in the kitchen!  The other day I was going to a lunch gathering.  Soup was going to be served and we were to bring something to go with it.  I didn't want to take the normal sandwich, but I didn't want normal cornbread either.  I have been wanting to try to make my own jalapeno cornbread, but I didn't want the traditional jalapeno cornbread either.  Picky, picky!  :)

After doing several recipe searches, I was just unhappy with what I was finding, SO... my own southwestern style cornbread experiment began on a Thursday morning at 6:30!  I was extremely pleased with the results and a couple have asked for the recipe, so I knew I had to share it with you!

To start, I started preheating my oven to 425 degrees and greased my cast iron skillet with Crisco using a paper towel.  You can also spray a cornbread stick pan if you wish.  Yes, I said spray.  For some reason, when I grease mine like my skillet, the bread sticks in the grooves.


Then I prepared my cornbread.  I mixed 1 cup all purpose flour, 1 cup cornmeal, 1/8 cup sugar, 1 teaspoon baking soda, and 1/4 teaspoon salt in my trusty mixing bowl.

Please excuse the extra dish holding the sugar scrub.  I had to leave it there
so I wouldn't forget to take it with me.  :)
Next, I added in 1/4 cup melted butter and


1 1/4 cup milk.


I stirred this together a bit before adding 1 egg.


Again, I stirred just a bit before adding one cup of shredded sharp cheddar cheese, one minced jalapeno with only half the seeds, and


One cup of creamed corn with most of the milk poured off.  I have corn that I creamed myself over the summer in my freezer, but I am sure canned cream corn would work too.  Just remember to pour off the milk.


This was mixed well before spooning and pouring into the skillets.


This was placed into the preheated oven and baked 22-25 minutes until the top was golden and a toothpick inserted in the middle came out clean.

I apologize for the bad photo.  Can you believe I forgot to take one with
my camera?  This is one I made with my phone.
Again, this recipe was a hit with my children even though they didn't like the occasional hot spot.  :)  I had to compete for the last slice!

If you try it, let me know what you think!

Southwestern Style Cornbread
1 c all purpose flour
1 c cornmeal
1/8 c sugar
1 t baking powder
1/2 t salt
1 1/4 c milk
1/4 c melted butter
1 egg, lightly beaten
1 c shredded sharp cheddar cheese
1 c cream corn
1 jalapeno with half of the seeds removed, minced

In a mixing bowl combine and stir together the flour, cornmeal, sugar, baking powder and salt.  Add the milk, melted butter, and egg.  Stir together lightly.  Add the cheese, corn, and jalapeno, and mix together well.  Pour mixture into a greased skillet.  Place into a oven preheated to 425 degrees.  Cook until golden on top.

Until we meet again, may you be blessed!

Simple Things!


Last week I put this post on Facebook:  Putting my feet down in Montezuma and picking up my 6 pounds of delicious Ohio cheese: it is the simple things, y'all! Doesn't take much to make me happy!  

My friend, Jane  (That is a link to take you to her Mary and Martha website.), told me to put it on my blog.  I still am not sure why, but I figured, "Why not?"  

Sometimes, during the holidays, we find ourselves caught up in festivities and big "WOW" moments, but sometimes, the heart just craves Jesus, friends, heartfelt conversations, and familiarity.

I guess to more fully understand this post, one must first understand that Montezuma is the town I have found our church home and close church friends I consider family.  With all that has happened this fall and winter, I haven't been able to go very often.  Well, someone from Ohio was coming down and offered to take orders for the most delicious cheeses to bring to us here in the south!  Having had this cheese several times at different functions, I knew I was placing my order!  If you have never had it, if the opportunity to get any ever arises, you simply must jump at the opportunity!

The day I went to pick up my cheese, I went alone and drank coffee along the way.  Just to drive in to Montezuma, my spirits lifted and my heart soared!  I am not quite sure why other than I finally felt like I was home again.  I felt at perfect peace and the world was right again.  I smiled so much, my cheeks ached!

Still, when Jane told me to put this on my blog, I didn't know what to do with it!  Well, I finally figured I would just show you the first thing I did with it when I walked in the door!


I sliced it.


Then I made cheese toast on hamburger buns because I didn't have bread!  Yes!  Such simple things can make me so happy!  

Later that night, my little girl secretly asked if she could use her new Christmas gift to surprise her daddy and brother with cookies when they got out of the shower.  I didn't want to make more mess, but I was so blessed by her wanting to do something so sweet, that I couldn't say no.  And guess what?  She happily cleaned up her own mess.  Wow!  What beautiful blessings I would have missed if I had said no!


Easy Bake Microwave chocolate cookies and fondant
I guess it is just the willingness to see God's blessings in ANY situation that make one happy!  Oh, thank you LORD for all your tender mercies and gifts!

One more precious set of friends to see, and I will feel like my Christmas is complete!

Until we meet again, may you be blessed!

Friday, January 3, 2014

Apple and Sweet Potato Bake

Last year I wrote about our traditional New Year's Day meal.  This year I just wanted something a little different to go with it.  I thought about my sweet potato souffle, but my time was short and we had just had it over Christmas.  Instead, I looked at the the sweet potatoes I had left.  I remembered a recipe from my old Amish cookbook I had tried with apples and sweet potatoes mixed.  It was good, but I didn't like the mace in it.  The wheels in my head began to spin.  Hence, Apple and Sweet Potato Bake was born!  :)


To make it, I peeled two medium apples and chopped them into bite size chunks.  I squeezed the juice from half a red navel orange over them.  Any orange will work.


Then I peeled and sliced three small sweet potatoes and added them to the apples.  On the mixture, I dotted 1-2 tablespoons of soft butter.


Next, I made the topping/glaze.  I started by melting 4 tablespoons of butter.  To that, I added 1 cup of brown sugar, 1/2 cup of flour (I have made this topping without the flour for my sister who is gluten intolerant, and it is still very good.), 1 cup of chopped pecans, and 1 teaspoon of cinnamon.


All the ingredients were mixed well and sprinkled over the apples and sweet potatoes.


This was placed in a 350 degree oven for thirty minutes.  At that point, I removed the dish and stirred everything together.  I put it back in the oven to cook until done (20-30 minutes more).


I was worried my children wouldn't like it, but upon tasting it, my daughter declared she was saving hers for dessert!  :)  Love that little girl!

Did you try a new recipe over the holidays?  Feel free to share!

Until we meet again, may you be blessed!

Christmas Crafts

Yes, I know it is after Christmas, but I promised my next post would have to do with Christmas.  Well, I can't break a promise; it is a "weakness" ;) of mine.

With all the traveling we have done and the emotions of that coupled with the emotions of a very tragic death in the family of very close friends, our Christmas was very low key and quiet this year.  I did, however, manage to do two of the craft projects I wanted to do.

The first was making a couple of card holders.  I can never seem to find the right place to put them so they can be displayed and enjoyed.  When I found this project on Pinterest, I knew it was a solution I could make and do.

I bought two sheets of foam board and some Christmas fabric at a craft store on a fun shopping trip with my sister.  I cut the fabric just a little larger than the boards and used rubber cement to glue the fabric to the boards; it was all I had, lol!  I tried to use the rubber cement to glue the ribbon hangers, but it wouldn't hold.  I ended up using thumbtacks on a dot of glue to secure the ribbons.  This is the final result.


After building my confidence with this little project, I decided to tackle the big project that was causing anxiety, the burlap and lace tree skirt.  It was another Pinterest project I found a while back.  I honestly didn't know if I had it in me to do it, and have it look nice.  Call me crazy, but I actually found myself with the fabric in my lap praying God would guide me so that the materials, time, and money would not be wasted.  God answered that prayer.  This is the proof!


I could never begin to give you directions, but the link above offers some guidance.

After getting these two projects out of the way, I was finally ready to face the messy house and prepare for Christmas activities.


I covered the table, got busy cleaning, and chased the blues away. (Yes, it was all real...the sewing items stayed right there just until we sat down with my funny family for Christmas Day dinner.  :) ) I must confess, though, that the true joy of Christmas carried me through this Christmas season.  It is what I try my best to teach my children.  I pray that they really saw that in my life this year.

Until we meet again, may you be blessed!

Wednesday, December 11, 2013

Canning Collard Greens and Blackeye Peas

Hello, friends!  After taking a very long and unexpected fall break that began with a trip to Pennsylvania to visit a very dear friend, leading to an emergency room visit with a gallbladder attack, a surgery, and a trip to Texas, I am BACK!

I know, I know...It is Christmas time, but....I just had to share a canning post.  I promise the next post will be Christmas related!  :)
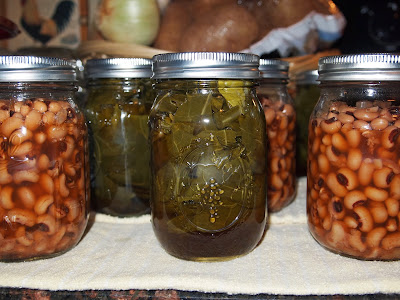
This could be Christmas related.  I have served this at my Christmas
dinner before!
Since I have recovered from surgery, I am finding the urge to be back in the kitchen with my canner!  The other day when I was grocery shopping, I came across a beautiful display of collards.  I knew a bundle was bound for my canner.  We love to eat these on New Year's Day, but I don't like to be standing, cooking in the kitchen all day on a holiday when the rest of the family is relaxing and enjoying time together.  Instead, I thought I would make life a little easier for myself this year while I had the time. These are very easy to can, even if the prep work to get the collards ready takes a little while.


First, I removed and washed each leaf.  Then I removed the stem from each leaf.  To do this, I fold the right sides of the leaf together and pinch along the stem.  When the collards are fresh, the leaves snap away from the stem rather easily, making it easy to peel the stem away.  Mine had been in the refrigerator for a few days, so they were on the limp side.


Once all the leaves have been washed and the stems removed, the leaves can be cut or torn to desired size.  I used to cut mine in nice, neat squares.  Then I had children.  ;)


I put water in these and brought them to a boil.  Then I poured that water off and added beef broth.  I let the collards cook down a while.  How long you let them cook is totally up to you.  I didn't cook mine completely.  I just cooked them until they were a little tender.  They will cook in the canner.  While those were cooking, I prepared everything I else I would need for canning them.


Once the collards were done cooking, I filled my jars with collards to one inch head space.


Then I used the beef broth to fill the jar to one inch head space.


The air bubbles were removed from the jar.

Yes.  I do usually use my magnetic grabby thingy.  :)
Then the rim of the jar was wiped clean, and the jar was sealed with a lid and ring before being added to the canner.


My one bunch of collards produced four pints.  I had a lot of beef broth left, so thanks to some quick thinking, I was able to can some blackeye peas along with my collards!

To do the peas, I added 1/2 cup dried peas to a hot jar and filled to 3/4 inch head space.


Air was removed as stated above, and the jars were wiped clean, sealed, and placed in the canner.


The directions for the collards were to process pints for 70 minutes at 10 pounds of pressure.  The directions for the peas were to process pints for 75 minutes at 10 pounds pressure, so the canner was set at 10 pounds pressure for 75 minutes to ensure safety.

For some odd reason, I had a hard time regulating my canner during this canning session.  My regulator kept wanting to jiggle way to fast even though I brought the canner's pressure up very slowly on a lower heat to prevent such issues, so unfortunately, I had a lot of siphoning due to having to adjust the temperature.  Such is the life of a canner, I suppose.  I will try again.  No problem.  :)

Sooo...what have you been up to this Christmas season?  I would love to hear from you!

Until we meet again, may you be blessed!

*Follow USDA canning guidelines to ensure safety of all home-canned foods.

Thursday, October 3, 2013

15 Bean Soup with Polska Kielbasa

Good evening friends!  It feels great to write to you again!  I have been on a cleaning and teaching spree around here to prepare for two big trips we have coming up!  I can't wait to share those with you, but for now, I thought I might share what I canned today!

This recipe is super easy.  To start, wash 7 quart jars and heat the lids.  In each jar pour 3/4 cup bean mixture.


Next, place one clove of garlic in each jar.  Then, finely chop one small onion and divide it among the seven jars.  Okay, okay...I didn't really need to take a photo of each step, but the jars were so pretty, I just couldn't help myself!  Please accept my apologies.  :)


Next, divide one 15 oz can of sliced, stewed tomatoes, including the juice, between the jars.


Slice and quarter a pack of polska kielbasa (I have found this to be my favorite in this, but you could use any sausage without sage.).  Place 1/4 cup in each jar.  Freeze any remaining sausage for another yummy recipe!


At this point, I sat my open jars in the warm water of my open pressure canner while I brought water in my stock pot to a boil.  When the water was boiling, I removed one jar at a time, filled it with the boiling water to 1 inch head space, removed air bubbles, wiped the rim clean, and sealed it with a lid and band.

Sorry about my messy counter!  We've been super busy!  :)
The jar was then returned to the canner.  I repeated this process until all the jars were done.  Then the jars were processed for 90 minutes at 10 pounds pressure.  Make sure to check the correct pounds and time for your area!  Don't want anyone getting sick because of my directions!  Yikes!


It doesn't look the prettiest, but hey, throw it over some cornbread, and oh my!  You'll have a bowl of deliciousness!

***Update:  This will need to be seasoned with salt and pepper when reheating to eat!  :)

Have fun with your food, y'all!  Let me know what you think or what you have tried!

Until we meet again, may you be blessed!

*To ensure safe canning, always follow safe canning guidelines issued by the USDA.