Wednesday, July 12, 2017

Rosie's Cinnamon Candy Cucumbers

I get so excited when I find a food that is totally unexpected and excites me so much I can't wait to try it and make it myself! I especially love it when I can connect that recipe to a special memory or person. Such a recipe is what I want to share with you today!

A couple Saturdays ago, I was at church picking up my dishes from that evening's VBS fellowship when a friend was at the table nibbling something I had not seen on the table earlier but piqued my curiosity. Those pretty little red things caught my eye. They looked like red celery, had the crunch of water chestnuts, and had the lightly sweet flavor of a gentle cinnamon. I knew then and there I would would have to go on a embarrassingly relentless search for the person who brought the little jewels and figure out what they were and how they were made. As fate would have it, when I was ready to leave, I was blocked in and had to go back in to wait until I was able to leave. Would you believe when I went back in, I sat down right in front of the dear lady who had actually made my newly discovered gems?! I was so excited! Her name is Rosie, and I have come to know her as a sweet friend over the last few years. I enjoy her company so very much! I have enjoyed every minute I've ever spent in her presence. I have always left a visit with her happy and cheerful. She spent the next few days kindly and patiently answering my many questions.

Today, I present to you Cinnamon Candy Cucumbers! The following is the picture of the original recipe as Rosie sent it to me. I changed the name as a personal preference, added a couple details, and changed the processing time in my directions below, but the recipe ingredients and measurements are the same.


Cinnamon Candy Cucumbers 
Ingredients:
2 gallons of slicing cucumbers (about 10 lbs)
2 c pickling lime
2 gallons water
1 c vinegar
1 T alum
2 c vinegar
2 c water
10 c sugar
3 10oz bags red hot cinnamon candy

Directions:

Day one: Prepare 2 gallons of large cucumbers by peeling, seeding, and cutting into 1/4" slices. 


Soak overnight in a mixture of 2 c lime and 2 gallons of water. 


The lime will settle to the bottom and is normal. The recipe didn't say to, but I stirred mine around every so often. 


Day two:
Pour off lime water and wash.

You want to wash
Well to remove the
Lime.
Soak two hours in cold water. I added some ice since the water coming through my pipes doesn't get very cold without running a long time during the summer.


Drain that water again. Then mix 1 cup vinegar, 1 T alum and enough water to cover cucumbers. Soak two hours and drain.


Just before the two hour soak is over, mix and boil 2 cups vinegar, 2 cups water, 10 cups sugar, and 3 10oz. bags of candies.


Pour the hot liquid over the cucumbers. Not all my candies would completely dissolve. I finally gave up and poured them over the cucumbers. They eventually dissolved on their own.

It looks a lot different the next morning!


Day 3 and Day 4:
Place a large pan under a colander, and drain the cucumbers.


Bring the drained liquid to a boil, and pour the hot liquid back over the cucumbers. 

Day five:
Drain the cucumbers and reserve the liquid the same as above. Pack the cucumbers in pint jars leaving 1/4" headspace. 


Bring the reserved liquid to a boil and pour over the cucumbers leaving a 1/4" headspace.


Wipe the rims clean with a damp paper towel or cloth, and seal with a flat lid and ring. Process in a rolling water hot water bath for 10 minutes. Turn off the heat and let the jars sit in the water ten minutes before removing them from the water to avoid the liquid siphoning from the jars.


Until we meet again, may you be blessed!
*To ensure the safety of your food, follow the guidelines given by the USDA. I do not know if this recipe has not been tested or approved. 

Sunday, July 9, 2017

Peeling Tomatoes

Good day, reader friends!

I have several things to share here on the blog with you! The garden and canning are keeping me so busy, I just can't seem to find enough time to get posts written! That's a good problem to have, though! This is a short post I knew I could squeeze in before the children wake up.

Yesterday, I tried my hand at Black Bean and Corn Salsa! I cannot wait to share the recipe with you! As I was taking pictures to prepare for that post, I realized I was going to have to do something to shorten that post some. That's how the idea for today's post was birthed.

One of the key steps in making that salsa is to peel the tomatoes. I have several friends who were never taught their way around a kitchen and have been so busy living their life, they have not had the opportunity to teach themselves. They enjoy having basic tasks broken down into easy to understand steps. This post is for them and my reader friends who find themselves in the same boat. I know I am grateful for my friends, Barbara Ann and Lisa, who came and taught me when I made my first batch of salsa and spaghetti sauce!

The first step is to set a large pot of water to boil on the stove. The water only needs to be deep enough to submerge your tomatoes. Next, gather and wash your tomatoes.


Continue by cutting the core from the tomatoes with a small paring knife. I also like to lightly score an X through the skin on the bottom of the tomato with my knife. It seems to make the skin split more easily in the hot water.


When all the tomatoes have been cored, it's time to drop the tomatoes into your boiling water. It's important to wait until the water is at a rolling boil before dropping the tomatoes. I drop the tomatoes into the water three or four at a time. It's important to only do a few at a time to be able to pull them out of the hot water quickly. To remove them, I used a fine mesh strainer with a handle, but a slotted spoon can also be used.


Leave the tomatoes for 30-45 seconds or until the skin starts to split.


Immediately drop them into cold water to quickly cool them back down. Somehow I managed to not get a picture of them cooling in the sink. You can catch a glimpse of it in the picture above, but I'm sure you get the idea. It's just a little cold water in the sink with a little ice to make sure the water is nice and cold. Again, the water doesn't have to be deep, just deep enough to submerge the tomatoes. It doesn't take long for them to cool. I was pulling one batch out of the sink as I was putting one batch from the boiling water in. Once your red (or green) globes of yumminess have cooled, move them to a strainer to drain.

The green tomato is a ripe. It is a
Green variety from Baker Creek
Called Green Vernissage. They are
So yummy!

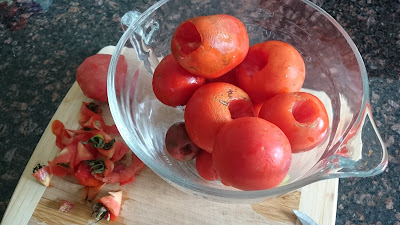
Here you can see how the skins are already pulling away from the tomatoes. That is exactly what you want to see. Now all that is left to do is gently slip and peel the skins from the tomatoes.


There you have it, my friends! Nice and easy and quick! Before I leave you, I would like to add one last tip. Make sure your tomatoes are nice and ripe. It makes this process much easier. I have done it with tomatoes that weren't as ripe, and it didn't work as well.

Until we meet again, may you be blessed!💕