Pages

Monday, October 24, 2016

Making Paprika

Good day, my reader friends! Someone in one of my Facebook gardening groups asked about making Paprika. It reminded me that I never wrote this post I have wanted to write since last fall since, surely, there are others out there just like me!

In my sheltered life I never stopped to think about where paprika came from (even though it is one of my absolute favorite spices!) until I ran across paprika peppers in one of my seed catalogs. It was one of those lightbulb moments! Of course paprika came from paprika peppers! Where else did I think it came from! Sadly, and truthfully, I didn't even know there was a such thing as paprika and pimento peppers until that very same day. Isn't that incredibly sad that so many of us have no idea about such basic and fundamental knowledge!? I am so thankful for the gift of being able to garden and explore! I have learned soooo incredibly much! I knew that day that both paprika and pimento peppers would be in my garden the following spring.

Fast forward to now. Those peppers did indeed go in my garden, and they produced beautifully! Today, I'll share with you how I made my own paprika powder.

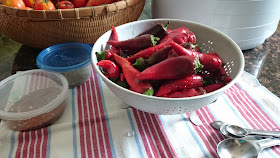
After picking the paprika peppers from my organic garden, the peppers were brought in and washed before preparing them for the dehydrator.


Please pardon the spoons! I was also making different spice mixes for tomato sauce at the same time. :) Yep..I know..that was slightly random and veers off topic. I know the English teachers are having a fit, but I thought the picture was pretty, and I don't have to worry about my English teacher's red pen anymore, and... I digress.


Back to the subject. 😁 Next, the peppers were seeded and sliced.


I made sure to save plenty of seeds for next year!


The sliced peppers were then placed in the dehydrator. I set the dehydrator to the fruit and vegetable setting on my machine which is 135 degrees Fahrenheit or 58 degrees Celsius.


I let the dehydrator run until the peppers broke with a dry, crisp snap, and then I placed them in my coffee grinder.


The dried peppers were pulsed and ground into a fine powder and poured into a jar. Just a tip: let the powder settle before opening the grinder.


This is from the very first batch I made. I'm sure the best way to store it is in an airtight container with an oxygen absorber, but we are taking baby steps here. I was so amazed and excited! I felt so very humbled and blessed with the knowledge that was bestowed upon me that I could use for my family. God is so good! I can't wait to plant at least twice as many plants next year!

Until we meet again, may you be blessed!

Wednesday, October 19, 2016

White Bean and Ham Soup

The crazy summer madness has finally died down here. Homeschool has started back, we have had a few nice, crisp fall days (even though the weather has tried to squeeze in a couple more days of summer here lately!), and we have even visited the Georgia National Fair! It finally feels like autumn is here, even if it's just in the wishfulness of my mind! That sunburn from the fair tried really hard to steal my idealistic autumn thoughts, but those thoughts are still holding on by a thread! 😊 My mind has turned to pumpkins, cozy sweaters and blankets, cool weather, pretty leaves, and comfort food.

I have three boxes of apples awaiting my attention, but today, I started cleaning out my bean stash. I searched through my basket of dry beans and pulled out all my Northern Beans. I think I had three pounds of them. Since I had diced ham, shredded carrots, and celery in the refrigerator, I went ahead and turned them into soup for us to have later on during the winter. This recipe is so quick and easy, I just had to share it. The following recipe is for one quart of soup, so of course, multiply the ingredients to make as many as you need.


Ingredients 
1 scant cup dried navy or northern beans, sorted and rinsed only
1/2 c cubed ham
1/4 c shredded carrots
1/4 c chopped celery 
1/4 c chopped onion
Beef or chicken broth

Add all ingredients to a quart jar. Cover with boiling broth. Leave one inch headspace. Process 90 minutes at 10 pounds pressure. Adjust time and pressure for your altitude. 

I had enough ingredients to get six quarts and one pint. I think they turned out so lovely! 


Perhaps one day this winter when I am wearing a cozy sweater, I will get to enjoy them while snuggled under a fuzzy blanket. 😀

Until we meet again, may you be blessed!
*To ensure the safety of your home canned items, be sure to follow safe canning guidelines issued by the USDA.

Friday, September 30, 2016

Meal Planning with Master Lists

Good evening, friends. I hope this early autumn evening finds you well and blessed! Hopefully, you had a productive week. Did you have a project you worked on? I did!

A couple years ago, I wrote this post explaining how I plan my menu and write my grocery list at the same time. Except that my computer with the template crashed and I now write my menu and grocery list by hand, I still plan the exact same way. I still depend on that piece of paper as much now as then. In fact, I am trying to get into the habit of using my phone to take a picture of it just in case I leave home without it.

The one thing I have wanted to do for a long time, though, is to work on some master lists to make my planning run more smoothly and quickly. I don't know about you, but more times than not, when I sit down with that blank sheet of paper, I get a huge mental block. Once ideas start flowing finally, I often spend a lot of time flipping through pages of recipe books and notebooks and websites trying to find ingredients lists to add missing items to my grocery lists. Many times I have guessed at the ingredients, telling myself I would check later, yet later never came. I'm sure you can guess what has happened too many times when I tried to make a meal. We live too far from a store to just run up the road to pick up one or two forgotten ingredients. That, along with a challenge from a friend, was my motivation to bite the bullet and get it done. If there was any bad news about the process, it would be that it took me a whole day, but the good news is that it only took one day! It didn't take me nearly as long as I thought it would! I was even doing our homeschooling during a lot of it!

In case you are curious about trying it or have thought about doing it but don't know where to start, I thought I would share with you what I did. Maybe it will spark brilliant ideas you can share with me or others!

Since this is something I hope to pass on to my own daughter one day, I put a list of kitchen essentials in the front. My plan is to share it with her. I plan to buy a few items during special days such as birthdays or Christmas. She can check the items off to see what she has and still needs to add to her hope chest to be prepared for her own kitchen. It is a very basic and minimum list. There is room to add other items either of us may think of.

Behind that begins my master lists.


I have list for chicken meals, beef meals, pork meals, fish meals, soups, salads, veggie/fruit sides, and rice/pasta/bread sides. On these lists are the most common things I prepare from those groups. That way, when I sit down to plan, I don't draw a blank as to what meals to write down. I also hope that this will help keep our meals varied so that we don't fall into a rut of having the same things all the time.


I tend to struggle most with breakfast, lunch, and snack planning, so there is also a master list of meal ideas for each of those.


The longest part of this process was starting with each meal idea and listing each ingredient to make that meal or item. Finally! For the rest of eternity (here on earth, anyway), I have everything all in one place!!! I no longer have to do so much searching just to make my menu and grocery list!!! I am so excited!! My goal wasn't to have the recipes here. My goal was just to have a quick reference for the ingredients. Perhaps adding recipes will follow later...😨 much, much later...maybe never later. 😄 I think adding a note about where to find the recipe would be much easier.

I hope someone feels inspired. May my insanity be your sanity!

Until we meet again, may you be blessed!

Wednesday, August 31, 2016

Starry Quiet Night


These photos have nothing to do with my post for tonight. These were just images from the world around me that I found beautiful and captured. I just thought I would share them with you. 😊

I walked outside tonight. It was so incredibly dark and quiet and still. Simply beautiful, full of the Spirit of God. I looked up to the endless heavens to see some of the bright stars twinkling at me.The heavens were so wide and boundless. It reminded me of a thought to God I had just a few minutes before I walked out the door: Lord, I thank you for all you have given me. I have all I need. If I don't have all I need, I have some of what I need. If I don't have any of what I need, I have you. Surely, that is enough. I always have a reason to praise, You. Thank you, LORD, for being my everything.

Until we meet again, be blessed.

Tuesday, August 23, 2016

Avocado Delight


This was a totally bizarre recipe creation for me. I had never heard of this or had this combination of ingredients, but one morning I woke up with the most incredible craving for it. I could almost taste it in my mind! I had to get the ingredients just to make it! This combination of ingredients left me a little hesitant at fist, but it was a palooza of "wow!" in my mouth right from the first bite!

If you are following Trim Healthy Mama, this makes a wonderful S meal! Be a little adventurous and try a little "Hello!!" today! I hope you enjoy!

Avocado Delight
2 slices of bacon
2 avocado wedges
1/2 c low fat cottage cheese 
1 T salsa
Salt and pepper 

Fry the bacon until crispy, and then let the slices drain on paper towels. In the same pan, while the bacon grease is still hot, fry the avocado slices a few minutes on each side. I actually fry the avocado slices in the same pan as my bacon cooks to save time. When the bacon is cool enough to handle, crumble the slices and spread in a ring. In the middle of the ring, mound the cottage cheese. Sprinkle on salt and pepper. Top it with one tablespoon of salsa. I like to use my homemade salsa, but your favorite salsa will work perfectly! Top the salsa and cottage cheese with the avocado slices, and viola! You have your avocado delight! Your taste buds will thank you!

My friend, Appie, likes to finish hers with a little extra zing of lime juice. Go for it, and own it!

Until we meet again, be blessed! 💕


Swamp Cabbage


For a while my husband worked in Texas. He and a few other guys rented a place together and would take turns cooking supper. One of the guys was originally from Louisiana. On that guy's first night to cook, I got a text from my husband saying his friend was going to send me the recipe. My husband said I HAD to save it, and cook it for him.

Indeed, his friend sent the recipe, and it was quite easy: Fry your favorite ground sausage and drain. Pour in one can of Rotel and one head of chopped cabbage. Cook until cabbage is done.

I made it that was several times, but it just was lacking "something."  Last night, I made it, and I couldn't stand it any longer. I had to add my touch. Oh my! It finally had the "something" it needed. Today, I give to you

Swamp Cabbage 
2 lbs. Regular Jimmy Dean Sausage
2 cans mild Tomatoes with chilis 
2 heads of cabbage, chopped
1 c frozen seasoning blend 
1-1/2 t garlic powder 
1-3 t salt, to your taste
4 T butter 

In a large stockpot, brown the sausage and drain, if needed. Add the remaining ingredients and mix well. Cook until the cabbage is soft, stirring occasionally to prevent any sticking or burning. Enjoy as is (especially if you are doing Thm!) or with your favorite southwestern style cornbread!

Until we meet again, may you be blessed!💕

Monday, August 22, 2016

Muscadine Jelly


Hi friends! Today's recipe is one I wanted to share with you last summer, but when I made it last year, I forgot to take pictures. Alas, I had to wait to make it again this year so I could get the pictures and share it with you.

The little beauties above are eight half pints of muscadine jelly. Earlier today, I posted a picture of the muscadines on Facebook stating that for this southern girl, it might as well be a bowl full of decadent chocolates. It is so true! I LOVE muscadines! It is also true that muscadine jelly is the favorite jelly of my household. I hope you enjoy the recipe!

Muscadine Jelly 
5-6 lbs fresh muscadines for extracting 5 c juice
1 box regular pectin 
6 c sugar 

Place 6-8 half pint jars in the canner. Place the lid on the canner and turn the heat up to start sterilizing jars as you work. Boil jars for ten minutes. When my jars have boiled for ten minutes, I turn the heat down to low to keep them hot until I am ready for them.

Wash grapes (Muscadines are wild grapes.), making sure to remove any stems or leaves.


Place the muscadines in your pan. Turn the heat up and begin mashing the grapes as you stir. 


Carefully bring the grapes up to a slow boil as you continue to mash and stir. Turn the heat down and simmer 10-15 minutes as you continue mashing and stirring to extract the juice and break down the pulp some.


If you don't have a food mill, really mash those berries! You want to get as much juice out as you can. Remember, you need five cups of juice for the jelly. If you do have a mill, run the muscadines through. 


You can use the juice at this point, but I filtered mine through cheesecloth first. 


At this point, I only got 4-1/2 cups of juice. Lucky for me, up to a half cup of water can be added. 😊 


At this point, I stopped to make sure I had everything set up for once the jelly was done. Jelly is something you can't stop once you start, and you need to move quickly once it's done. I've learned from experience to make sure everything is set up and ready to go. There is a pot holder to sit the pan of hot jelly on. The towel is laid out to place my hot jars that are in the canner on, the lids are behind the canner in a pan of warm water, the rings are behind the towel, and the magnetic lid lifter is on the stove beside the knob. My funnel and a moist paper towel for wiping jar rims can't be seen in the photo. The sugar is all measured out. I removed 1/4 c of the sugar and mixed the pectin in it. That's what is in the blue measuring cup. There was an extra box of pectin just in case my jelly wasn't setting and I needed to add extra. The stock pot is on the stove ready to go. Let the fun begin!!


This part of jelly recipes is always lacking in good pictures simply because you have to move quickly and stir constantly. Poor the juice into the stock pot. Slowly pour in the pectin mixture, stirring as you pour. Bring the mixture up to a rolling boil, a boil that cannot be stirred down. 


See? Not too much to see there! So sorry! At that point, though, pour all the sugar in at once. 


Stir the mixture constantly, and bring it back to a rolling boil. Once it is at a rolling boil, boil exactly one minute. Immediately remove the jelly from the heat and onto the waiting potholder. Quickly remove the hot jars from the canner and onto the towel. I quickly skimmed a little foam from the top of the jelly. This year, though, I tried a new method of scooping up the jelly in my ladle and skimming the foam from that. It worked so much better and was so much quicker. Each jar was filled to 1/4 inch headspace. Well, I tried, anyway! 😄 At this point, I skimmed any excess foam from the top of individual jars. The rims were wiped clean, and the jars were sealed.


The jars were placed back in the canner with one to two inches of water covering the tops of the jars. The water was brought up to a rolling boil with the canner lid on, and the jelly was processed for five minutes. One more reason to love jelly! It's so quick! Once the five minutes are up, turn the heat off, and remove the canner lid. Let the water come to a full rest for about five minutes. Then remove the jars with a jar lifter. Place the jars on a doubled towel in a draft free area. Do not disturb the jars for at least 24 hours.

When it is all done, you should be left with beautiful little jars of jelly! 


Until we meet again, may you be blessed! 💕 
*To ensure the safety of your canned foods, make sure to follow safe canning guidelines issued by the USDA.

Monday, August 15, 2016

Spicy Pickled Cauliflower


Hi, y'all! The other day was another new recipe day!

A while back we had a pipe burst causing us to have to have our floors replaced. One super nice young fellow who had grown up on a farm came to measure and was in awe of all the jars in the pantry. He told me how his family in Pennsylvania ships down a case of spicy pickled cauliflower every Christmas. He made it sound so yummy, I began a search for a recipe that day! There are very few spicy pickled cauliflower recipes out there! I never did find one certain recipe I really liked so I just made one my own.

This is the link to the original recipe. Doesn't that look pretty? This recipe was so very close to what I was looking for, I made very few changes. I couldn't not give credit to the original. 😊

Spicy Pickled Cauliflower 
4 t coriander seeds
4 t yellow mustard seeds 
2 t cumin seeds
4 t black peppercorns 
2 t ground turmeric 
1 t red pepper flakes
1/2 c sugar 
8 c apple cider vinegar 
4 c water
20 cloves garlic 
2 small onions thinly sliced
2 small-medium heads cauliflower chopped into florets
2 red bell peppers seeded and diced into large pieces 

In a large saucepan, combine all the ingredients except the garlic cloves and vegetables. (Note: the onions can be added to the brine. I had never done it that way, so I tried it for this recipe. In the future, I will not put them in the brine.) Heat the brine to boiling. Add all the chopped vegetables to a large bowl and toss together. When brine is hot, pack the vegetable mixture into hot jars leaving 1/2 inch headspace. Pour hot brine over the vegetables in the jars leaving 1/2 inch headspace. Wipe the jar rims clean with a damp cloth or paper towel. Seal the jars. Place the jars in the canner making sure the jars are covered with at least one inch of water. Bring the water to a rolling boil. Process pints and half pints for 10 minutes once the water comes to a boil. 

This is what I did. After preparing my canner and heating my jars, I prepared my brine. I love making brings. They are so quick and easy. Here it is ready to go.


Next, I chopped up the vegetables and tossed them together in a big bowl.


Then I got my jars out and divided the garlic cloves between them.


The vegetables were then packed snugly into the jars.


The hot brine was then poured over the vegetables leaving a half inch headspace.


Lastly, the jars were sealed and processed.


When I was done filling the jars, there were a lot of onions left in the brine. I didn't want to waste them, so using a slotted spoon, I spooned the onions into a pint jar. The jar was filled with the hot brine leaving a half inch headspace. I processed the jar for ten minutes just like the cauliflower and peppers.


Aren't they little jewels? I love taking a peek at them when I walk through my pantry. The best part of this recipe is that the only thing that is hard about this recipe is waiting a couple weeks to try it!

I hope you enjoy it!

Until we meet again, may you be blessed!

*To ensure the safety of your food, be sure to follow all the safe canning guidelines issued by the USDA. 

Saturday, August 6, 2016

Basil Banana Pepper Jelly


I planted basil and banana peppers in the garden this year. Both have done really well, and I couldn't wait to make this jelly. We love pepper jelly around here. This recipe makes a very beautiful jelly.

Isn't that just one of the loveliest things you've ever seen!?

Before I give you my adventure in pictures, I'll give you the recipe.

Basil Banana Pepper Jelly 
1/2 c thinly sliced and seeded hot banana peppers 
1/4 c seeded and thinly sliced hot red peppers
1/4 c finely chopped red onion
4 large basil leaves cut into thin ribbons
1/4 t dried basil
3/4 c white vinegar 
3 c granulated sugar
1 pouch liquid pectin 

Prepare the canner, jars, and lids. In a large saucepan, combine the peppers, herbs, and vinegar. Stir in the sugar. Place the pan on high heat, and bring the mixture to a rolling boil. Stir in the pectin quickly. Bring back to a rolling boil, stirring constantly. Boil exactly one minute. Remove the pan from heat. Quickly skim off any foam that has formed. Then quickly pour the jelly into hot jars. Clean the rim of each jar, and seal them with a lid and ring. Place the jars back into the canner, making sure they are covered by at least an inch of water. Place the lid on the canner, and bring the water up to a rolling boil. Process pint and quarter pint jars for ten minutes. After ten minutes, turn off the heat and remove the canner lid. Let the water rest for about five minutes before removing the jars with a jar lifter. Place the jars on a doubled towel to rest for 24 hours. See the description below for tips on suspending the particles in the jelly.


Before I got started on this recipe, I prepared my jars in the canner. I started heating them so they would come to a boil and boil ten minutes before I was ready to use them. Once they boiled ten minutes, I turned the heat down and left them in the canner so they would stay hot until I needed them. While they boiled I got busy preparing the ingredients.

I seeded and chopped the peppers and onion. Next, I stacked and rolled four large basil leaves in a tube and sliced them into thin ribbons. I placed all these ingredients plus the dried basil into a large saucepan.

When it looks this pretty
This early in the process,
I can't help but get excited!

To this, I added 3/4 of a cup of white vinegar.


To that, I stirred in 3 cups of granulated sugar.


Next, this was placed on the stove. In the photo, you can see I have everything ready and waiting for when I pull the hot jelly off the heat. The lids are in a small pan behind the enamel canner.

To keep my pectin from spilling before I need it,
I place it in a cup by the stove as shown. Works like
A charm!

The mixture was placed on high heat, and stirred constantly, (except when I took this photo! 😜) until it came to a rolling boil. Then the pectin was stirred in, stirred constantly as it returned to a rolling boil, and was boiled exactly one minute.


The jelly was removed from the heat after it had boiled one minute. There was a lot of foam on the jelly.


The foam was quickly skimmed off. Then the jelly was quickly poured into hot jars, leaving 1/4 inch headspace. The jars were sealed with a lid and a ring. The jars were then placed in the canner with an inch of water covering the jars. The lid was placed on the canner, and the water was brought up to a rolling boil. The jars were processed for ten minutes. After ten minutes, the heat was turned off, and the lid to the canner was removed. I let the water come to a rest for about five minutes before I removed the jars from the canner and placed them on a doubled towel for 24 hours. I did let them cool for about thirty minutes and made sure the lids were concave before I gently tilted and twisted them to distribute the particles of herbs and peppers.  I did this a couple times, every few minutes, until the particles were nicely distributed.  Normally, with regular jellies or other canned items the jars shouldn't be disturbed.


Happy canning!!

Until we meet again, may you be blessed!
*To ensure the safety of your canned foods, make sure you follow all safety guidelines issued by the USDA.