In my sheltered life I never stopped to think about where paprika came from (even though it is one of my absolute favorite spices!) until I ran across paprika peppers in one of my seed catalogs. It was one of those lightbulb moments! Of course paprika came from paprika peppers! Where else did I think it came from! Sadly, and truthfully, I didn't even know there was a such thing as paprika and pimento peppers until that very same day. Isn't that incredibly sad that so many of us have no idea about such basic and fundamental knowledge!? I am so thankful for the gift of being able to garden and explore! I have learned soooo incredibly much! I knew that day that both paprika and pimento peppers would be in my garden the following spring.
Fast forward to now. Those peppers did indeed go in my garden, and they produced beautifully! Today, I'll share with you how I made my own paprika powder.
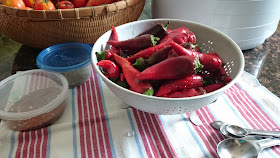
After picking the paprika peppers from my organic garden, the peppers were brought in and washed before preparing them for the dehydrator.
Please pardon the spoons! I was also making different spice mixes for tomato sauce at the same time. :) Yep..I know..that was slightly random and veers off topic. I know the English teachers are having a fit, but I thought the picture was pretty, and I don't have to worry about my English teacher's red pen anymore, and... I digress.
Back to the subject. 😁 Next, the peppers were seeded and sliced.

I made sure to save plenty of seeds for next year!
The sliced peppers were then placed in the dehydrator. I set the dehydrator to the fruit and vegetable setting on my machine which is 135 degrees Fahrenheit or 58 degrees Celsius.
I let the dehydrator run until the peppers broke with a dry, crisp snap, and then I placed them in my coffee grinder.
The dried peppers were pulsed and ground into a fine powder and poured into a jar. Just a tip: let the powder settle before opening the grinder.
This is from the very first batch I made. I'm sure the best way to store it is in an airtight container with an oxygen absorber, but we are taking baby steps here. I was so amazed and excited! I felt so very humbled and blessed with the knowledge that was bestowed upon me that I could use for my family. God is so good! I can't wait to plant at least twice as many plants next year!
Until we meet again, may you be blessed!


